
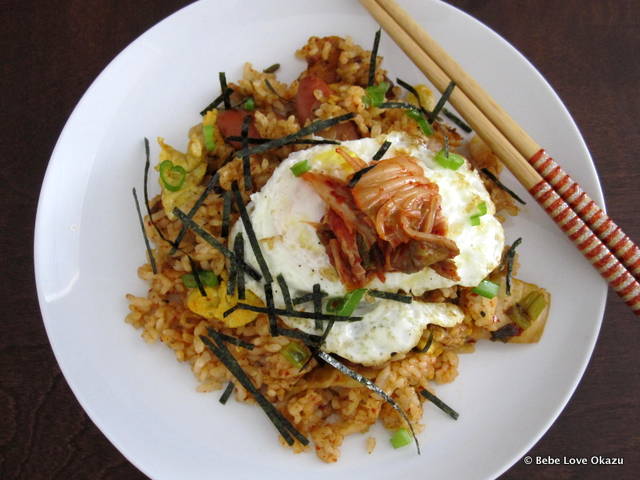
Kimchi Fried Brown Rice

Usually, I’m quite the motivated cook in the kitchen. However, these days (ok it’s been more like a few months now), all I wish for is some type of cooking-kitchen-elf who will make dinner magically appear. Let’s also include lunch for that matter, since a few days out of the week I also need to feed Bebe lunch on days she’s not in school and the appearance of a cooking-kitchen-elf twice a day wouldn’t be so bad…
[Wishful thinking, I know…]
Yes, on occasion, this cooking-kitchen-elf takes the form of “take-out”, but due to health concerns and budget constraints we can’t order take-out seven nights a week.
This is where “easy-semi-cooking” mother & wife steps in. Yup, that’s me, DESPITE the food and recipe/family blog AND any expectations that might come with someone who publishes any semblance of a food blog. There’s absolutely nothing wrong with quasi-cooking. Moving forward, I think I will share more of my short-cut dinners and or what I often market to my family as an “awesome dinner night”, which quite frankly, is better than nights that I market “awesome buffet night” A.K.A. a dinner comprised of multiple types of leftovers from the past two to three nights.
At least once a month, I visit the Korean market which happens to be walking distance from one of Bebe’s classes. It’s SO convenient to make a quick stop at the Korean supermarket to pick-up some of our favorite marinated chicken or pre-marinated Korean-style kalbi beef (Bebe’s favorite) or bugolgi beef (Nene’s favorite). All the meat is PRE-MARINATED. Additionally, our fabulous Korean market has an A-M-A-Z-I-N-G assortment of PRE-MADE side dishes. Our favorite side dish is japchae (Korean glass noodles), which I can actually make from scratch and have it turn out awesome (I say that modestly) thanks to a friend’s great recipe; HOWEVER, the pre-made japchae is delicious, very affordable, AND… I don’t have to cook.
Some of the pre-made side dishes we really enjoy are: 1) seasoned cooked spinach; 2) seasoned cooked bean sprouts; and last but not least, 3) kimchi.
Let’s just say Korean BBQ night at home is quite a favorite of mine (because it’s easy-semi-cooking) AND the family loves it.
Typically, I throw all the meat onto our big teppanyaki pan and dinner is cooked in just a few minutes. I’ll make some rice in our trusty rice cooker, and cook broccoli or other green veggie on the side, spread out all the pre-made side dishes and VOILA! Awesome Korean BBQ dinner night.
Love it.
We always have a significant amount of kimchi leftover because the Korean market is very generous with it’s portions. It’s perfect for making kimchi fried rice, which also makes for a secondary, “awesome dinner night” which requires very little cooking effort.
I usually have leftover beef or chicken, but sometimes I don’t, and the kimchi fried rice I make still turns out pretty darned good with or without meat, if I do say so myself.
My husband, however, prefers that most (if not all) meals include protein from a meat, so in this particular version of kimchi fried rice, I added sliced turkey dogs (nitrate/nitrite-fre, all natural), just for him. If I’m making kimchi fried rice for lunch and it’s just for myself, I’ll skip the meat and simply be happy with egg as the protein.
On to the recipe.
Honestly, kimchi fried doesn’t really require a “recipe” per say. The ingredients are simple:
- kimchi
- kimchi “juice” (the liquid it comes with)
- canola oil
- sesame oil
- egg (one to mix with the rice, and one fried as a topping)
- day old brown rice (which, in our home is a staple in our fridge)
- green onions (another staple in our fridge)
- leftover Korean-marinated chicken or beef (totally optional)
- other simple meat such as ham, sausage, hot dog, bacon (again, completely optional)
- kizami nori or thinly sliced roasted and seasoned seaweed (totally optional, but COMPLETELY delicious when added)
- salt to taste
- white pepper to season the fried egg (totally optional)
Whipping up kimchi fried rice is also really easy, but here are a Few Cooking tips:
- Cook the scrambled egg first, with a little kimchi “juice” and then remove from pan. Set aside.
- Sautee the brown rice with the scallions and sesame oil first. (If you’re adding pre-cooked leftover Korean meat, add it here, otherwise cook any additional meats such as ham, sausage etc. separately and set aside.)
- Then add the chopped kimchi and just a touch of kimchi juice to the fried rice, stirring until the rice is well-coated, and a nice shade of red.
- Add the cooked egg back in, stir it all.
- Add salt to taste (optional)
- Always serve additional kimchi along with the fried rice because if you don’t add any additional Korean chili or spices, the spices from the kimchi will become muted, and your rice will not be spicy.
- Add a slightly runny fried egg, lightly salted and seasoned with white pepper on top of the kimchi fried rice – PERFECTION!
In case you missed it, my version of traditional fried rice is available here.
Cheers!
- 1 to 2 cups kimchi, chopped (depending on how "kimchi-ish you like it)
- Kimchi "juice", liquid included with the kimchi
- Additional kimchi, as garnish
- 4 cups day-old brown rice
- 1 egg, scrambled
- Additional fried eggs, 1 per serving, optional
- ¼ cup chopped leftover Korean BBQ meat (chicken or beef), optional
- Additional meat such as ham, sausage, hot dog, bacon etc, (optional)
- ½ sprig green onions, chopped (reserve some for garnish)
- Salt, to taste
- White pepper, optional
- 1 teaspoon sesame oil
- Canola oil
- Kizami nori (thinly sliced roasted seaweed), for garnish (optional)
- In a large frying pan, sautee one scrambled egg with canola oil. Season with some kimchi "juice" and or salt and white pepper.
- Remove scrambled egg from pan and set aside.
- If you are adding meat, such as bacon, ham, or other meat (other than the pre-cooked Korean BBQ meat), sautee in pan separately, before adding-in the rice.
- In the same pan, heat sesame oil with canola oil. Add day-old rice (straight from the refrigerator cold, is better than warm), and chopped green onions and sautee until "fried".
- Add chopped kimchi and pre-cooked Korean marinated meat. Mix until rice is thoroughly coated with kimchi and the rice is now a shade of red.
- Add back in egg. If you used meat other than the pre-cooked Korean BBQ meat, add this back in at this time.
- Add kimchi juice, optional. Stir rice.
- Season with additional salt, to taste (optional).
- In a separate frying pan, make a fried egg or over easy to top the kimchi rice (optional).
- Serve kimchi fried rice topped with a fried egg. Garnish with additional chopped fresh green onions AND kizami nori (thinly sliced dried seaweed).
- Garnish with additional kimchi for added spice and flavor.
3 Comments